TripsQuad: Quad Waveshaper

My first eurorack module design is a quad waveshaper called the TripsQuad. 

It is open source and you can build it yourself. All the files for fab and assembly are here:
https://github.com/auxren/tripsquad

Here is a demo of the first prototype:

Simple DINSync Breakout Box

I recently got really lucky and picked up a TR-606 for stupid cheap.
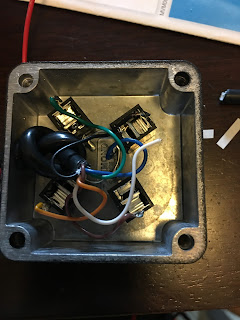
I made this simple little breakout both to interface with my eurorack system:


Just 4 jacks. Cut the end off a MIDI cable and broke out the cables in the box.  


The DINSync jack on the TR-606 puts out Clock, Reset, Start/Stop, and Fill. The box can work as an input or output source for the syncing, so my 606 can act as a master or a slave. 


Updating Industrial Music Electronics STILLSON HAMMER MKII

The update is pretty simple. I have tried it with a MAC and not with Windows yet, but I believe MPLAB IPE has the same process for both. 

You'll need a PicKit. I have a PicKit3 and haven't tried it with a PicKit2.

Download MPLab HERE

When downloading, make sure to select MPLab IPE and unselect IDE unless you want the full development suite.

Once you finish the download, open up MPLAB IPE.

Under device, type in 'dsPIC33FJ128GP310A'. That is the MCU used by the Stillson Hammer.
With your PicKit plugged in, you should be able to see it show up under tool. Connect to it. 

On the source line, select the Stillson's firmware.

Plug your PicKit into the back of the Stillson as shown:

Click program and it should run through it's little process of programming.

When complete, restart your system and you should see 1.500 firmware on your Stillson:


Pixmob Smart Lightup Bracelet Teardown

I recently had the chance to attend game 1 of the NBA finals in Oakland's Oracle Arena.
It was an amazing experience that landed me an all access pass to the Arena for games 1 and 2. The purpose of my visit was to test out my day job's product in the environment. Being that the product involves RF communication, it was a complete flustercluck of frequency chaos. I arrived early and got a chance to meet with the NBAs contractor for 'RF Coordination'. The head honcho explained to us how they try to regulate all the frequencies in the arena so people can freely communicate as they need. This includes event staff, ESPN folk, food people, ushers, and anyone else with a walkie. He mentioned that the 2.4 GHz and 5 GHz ranges were free range since they are near impossible to regulate, which makes sense. He also mentioned that reps from companies like ATT and T-Mobile were there checking their licensed spectrum to make sure no one encroached on their airwaves. All really cool stuff, but I digress since the purpose of this is to tear apart the bracelets given out.

Upon walking into the arena, I noticed that every seat had the 'Strength In Numbers' shirts along with bracelets masking taped to each seat. There was obviously some magic to these bracelets; they couldn't just be silicon bands with plastic tops. 

After getting my initial work done, I settled down in the media section and waited for the game to start. John Legend came out to sing the national anthem, the lights went down in the arena, and all the bracelets started lighting up. Not only were they lighting up, but the the colors were coordinated by section where some were red and some were blue. It was an amazing sight. 

Throughout the game, the bracelets would again light up. Also, clapping your hands seemed to set off the lights on the bracelet. When I had a few minutes break between running around and working, I used LightBlue to sniff the BLE in the area since I considered the light-up coordination was done via a BLE mesh network. Could it be that Pixmob was able to manufacture these bracelets with BLE at such a low price that they can be giveaways? Upon scanning, I found hundreds and hundreds of unnamed BLE devices around me. Red herring?? Also, is it possible Pixmob also threw in cheap accelerometers for the hand clapping detection? 

 Fast forward to the next day after work and I am home with this bracelet that still lights up when I clap. It's ready to be opened up. 


Two CR2032 batteries to power the device.


First thing I notice when cracking it open is the RGB in the center. Pretty standard lil' dude. Then I notice, no RF. So there is no BLE? Instead there is an IR reader. Could all the color coordination by section be done by IR? I guess so!

On the sides, we see 2 more RGB LEDs completing the complement of 3 RGB LEDs on the device.

I then noticed SW1 (the white cylinder). It's too small for pictures, but there are 2 leads coming out of it. One is a thick lead connecting to metal on the outside perimeter of the cylinder and one is a tiny thin wire in the center. Ahh!! The ol' spring contact trick! Inside SW1, the thin wire goes to a spring floating in the center. When the user shakes the bracelet, the spring in the middle makes contact with the metal on the perimeter which allows the microcontroller to know 'hey, time to light up these RGBs!' 

Speaking of microcontroller, what powers this guy? Seems that it is a MC81F4204 by a company called Abov. The MCU is a CMOS based 8-bit MCU with 4k of flash and 192 bytes of RAM. It has a 12-bit ADC and other basic features. The part doesn't seem to pop up on Octopart. Wonder how cheap they are in quantity. You can also see solder pads around the MCU. The geek in me hopes they are pads for a scalloped RF module incase you want to get real fancy with the board, but it's probably just for a larger IC along with programming headers (J1).

Overall, a cool little device with some nicely done DFM to bring down cost. 
Hopefully I can grab more when I'm at game 2 so I can hack em together and see what I can manage. 

Go Warriors!

America's Greatest Makers

I had the pleasure of competing against 23 teams of makers for the title of America's Greatest Maker and 1 million dollars. 

Tune in to TBS at 9PM on Tuesday night starting April 5th to catch the show. 


Synths and Bloops and Bleeps at The Bay Area Maker Faire


I have a booth at The Bay Area Maker Faire. 

Booth #55510 titled "Synths and Bloops and Bleeps." 

The purpose is to teach people about synthesis and get them to try it out and make some fun sounds. 
I will be bringing synths, a PA system, and a mixer. I am looking for other people to join me.
Shoot me an e-mail ( oren@auxren.com ) if you would like to bring a synth and jam out and teach or just swing by the booth and say hi. 

Intro To The Quill by Tabor

I've been working on The Quill for about 3 months now and figured it was about time to show off some of it's capabilities. 

The Quill is a wearable multi-instrument that sends MIDI data over BLE to your phone/tablet/computer/hardware. The Quill can be used as an instrument, as a means to add flavor to your instruments, and other uses that have been impossible until now. 


More updates to come....

BLE MIDI for All!!!


**UPDATED**


I've been waiting for the adoption of BLE MIDI in products for a while.
I first saw it when I received my Miselu Kickstarter keyboard. I was surprised at how
low the latency was and how reactive the interface was.

This year at NAMM, I saw that companies are starting to jump on the BLE MIDI
bandwagon. Korg has their wireless controllers, Yamaha has their self-powered dongles, ect.
I've been interested in using BLE MIDI myself for battery powered projects; I have too many ideas for 'wearable' MIDI controllers and cutting the wires would be great. 

I recently picked up a new Arduino 101 board:


It's the same size and same pinouts as the standard Arduinos, except this one uses Intel's latest and greatest SoC geared towards wearables, the Curie. 
I based my characteristic ID and service ID on Apple's BLE MIDI document (https://developer.apple.com/bluetooth/Apple-Bluetooth-Low-Energy-MIDI-Specification.pdf) since MIDI.org has yet to release an official spec. 

With that said, I have only tested this out with my iPhone (6s), iPad (air 2), and Macbook Pro, and it works perfectly. 


As shown above, you can go to your settings in an app like Apple's Garageband, choose Bluetooth MIDI Devices, and then connect to your device. In the example my device is called Tabor. After connecting, you are off to the races with whatever MIDI data you want to send and receive.

In a similar fashion, on OS X, you go to your Audio MIDI settings app and choose MIDI Studio. If you click on Bluetooth, you will see a window pop up looking for your advertising BLE MIDI compliant devices and give you a chance to connect to them.


When using OS X, once connected, your device shows up just like any other MIDI device on OS X, so your use is very flexible.


Here is the Github for the code: https://github.com/auxren/MIDIBLE101
Initially, I put up code for a bare minimum MIDI Sending device. I will be adding code for MIDI receiving and both together, along with some simple instruments you can implement with the Arduino 101.

As with everything, if you have any questions, feel free to reach out on twitter @auxren or email: oren@auxren.com

Update: added Airpeggiator instrument example.
Update: Fixed code to work with Arduino 1.6.9. Added licensing and more comments to Airpreggiator.